Metagenomics tutorial Part 2: annotation, binning and analysis
This Part 2 of an assembly-based metagenome tutorial. This is a modified version of the Anvi’o metagenome tutorial written by A. Murat Eren (Meren) and modified and reposted with permission by Adam Rivers.
Using Anvi’o
Anvi’o is a Python package that runs a web server for interactive visualization.
The anvio workflow covers many steps:
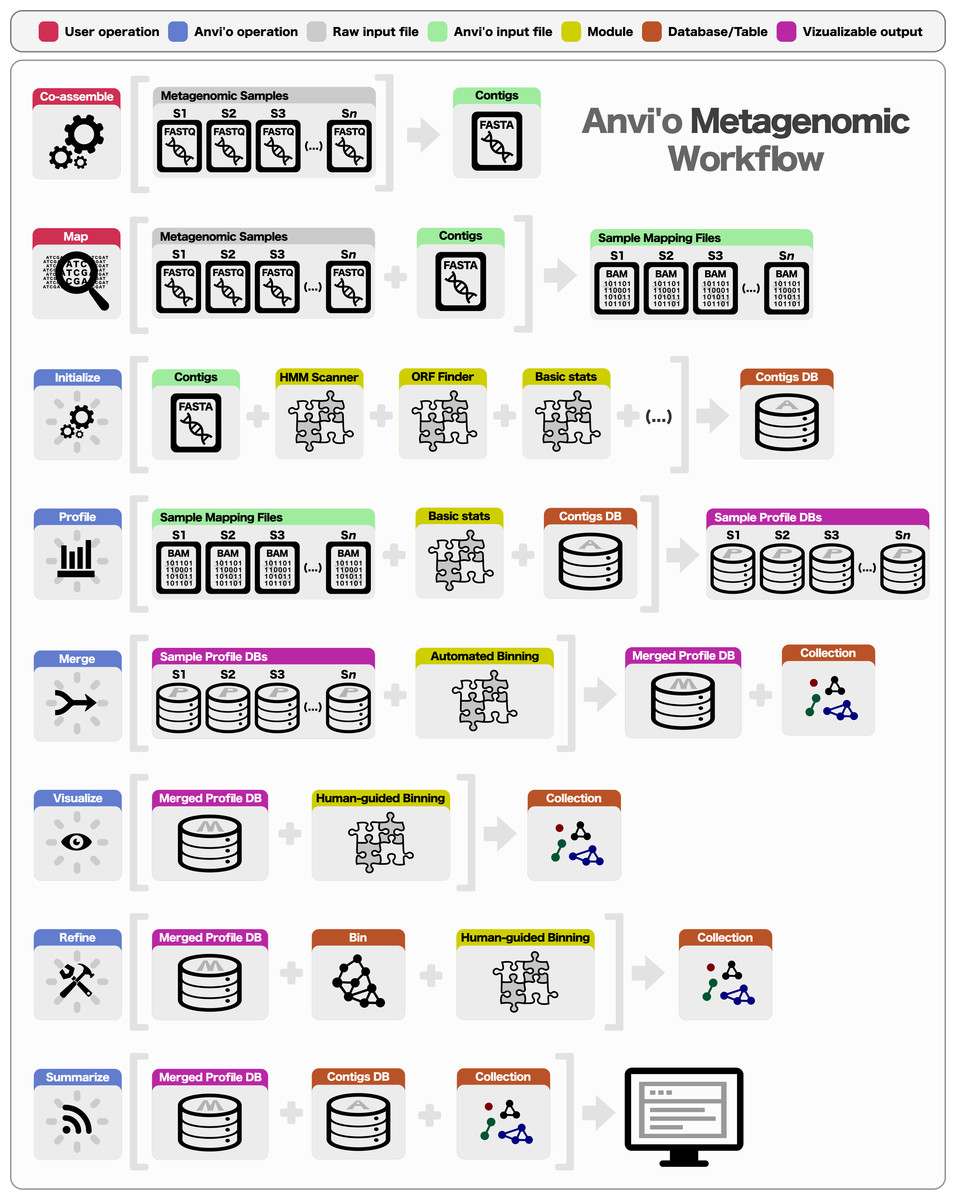 Figure from Eren et al. 2015
For the tutorial we will be running Anvi’o on Ceres.
ssh -o TCPkeepAlive=yes -o ServeraliveInterval=20 -o ServerAliveCountMAx=100 <user.name>@login.scinet.science
Request a compute node
salloc -p microbiome -N 1 -n 40 -t 04:00:00 # Change the wall time as per requirement
Load Anvi’o version 2.4.0 (It is a python module loaded with this command) and its required dependencies.
module load python_3/gcc/64/3.6.2
module load hmmer3/gcc/64/3.1b2
module load prodigalorffinder/gcc/64/2.6.3
The goal of this tutorial is to provide a overview of the Anvi’o workflow for the analysis of assembly-based shotgun metagenomic data. Throughout this tutorial you will primarily learn about the following topics:
- Processing your contigs
- Profiling your metagenomic samples and merging them,
- Visualizing your data, identifying genome bins interactively, and creating summaries of your results.
Help is available from the Anvi’o discussion group, or if you have found a bug you can open an issue. Regardless of the method to connect, please don’t forget to copy-paste the anvi-interactive -v output, the operating system you are using, or any other details that may be relevant to the problem.
Data sets in this tutorial
In part 2 we will use a dataset of contigs and mapping files derived from a human gut microbiome project. To make things easier to follow, we will use three mock samples throughout this tutorial: SAMPLE-01, SAMPLE-02, and SAMPLE-03 (these are subsampled from a human gut metagenome time series). They were co-assembled intocontigs.fa and the three BAM files we generated by mapping short reads from each sample to contigs.fa.
| File | Ceres path | Description |
|---|---|---|
| contigs.fa | /project/microbiome_workshop/metagenome/anvio/data/contigs.fa | co-assembled contigs |
| SAMPLE-01-RAW.bam | /project/microbiome_workshop/metagenome/anvio/data/SAMPLE-01-RAW.bam | Sample 1 mapped to contigs |
| SAMPLE-02-RAW.bam | /project/microbiome_workshop/metagenome/anvio/data/SAMPLE-02-RAW.bam | Sample 2 mapped to contigs |
| SAMPLE-03-RAW.bam | /project/microbiome_workshop/metagenome/anvio/data/SAMPLE-03-RAW.bam | Sample 3 mapped to contigs |
For simplicity, create a directory for this project and copy the data files into it.
mkdir metagenome2
cd metagenome2
cp /project/microbiome_workshop/metagenome/anvio/data/* .
ls
Take a look at your FASTA file
For the contigs and BAM files that come from your real data, there is one more thing you have to make sure you have: simple definition lines. Keep reading.
Your FASTA file must have simple definition lines, and if it doesn’t have simple definition lines, you must fix your FASTA file prior to mapping. This is necessary, because the names in contigs.fa must match the names in your BAM files. Unfortunately, different mapping software behave differently when they find a space character, or say a | character in your FASTA file, and they proceed to change those characters in arbitrary ways. Therefore it is essential to keep the sequence IDs in your FASTA file as simple as possible before mapping. To avoid any problems later, take a look at your definition lines prior to mapping now, and remove anything that is not a digit, an ASCII letter, an underscore, or a dash character.
Here are some bad deflines:
>Contig-123 length:4567
>Another defline 42
>gi|478446819|gb|JN117275.2|
And here are some OK ones:
>Contig-123
>Another_defline_42
>gi_478446819_gb_JN117275_2
If you have bad definition lines, you need to reformat your FASTA file, and do the mapping again (if you have done you mapping already, you can convert your BAM files into SAM files, edit the SAM file to correct definition lines, and re-generate your BAM files with proper names, but these kind of error-prone hacks require a lot of attention to make sure you did not introduce a bug early on to your precious data).
Re-formatting your input FASTA
You can use the following Anvi’o script to fix your definition lines:
anvi-script-reformat-fasta contigs.fa -o contigs-fixed.fa -l 0 --simplify-names
This script will give you your FASTA file with simplified definition lines. If you use the flag --report-file, it will also create a TAB-delimited file for you to keep track of which defline in the new file corresponds to which definition lines in the original file. While you are here, it may also be a good idea to remove some very short contigs from your contigs file for a clean start. If you like that idea, you can run the same command this way to also remove sequences that are shorter than 1,000nt:
anvi-script-reformat-fasta contigs.fa -o contigs-fixed.fa -l 1000 --simplify-names
Let’s just overwrite the contigs.fa with contigs-fixed.fa here to make things simpler:
mv contigs-fixed.fa contigs.fa
Creating an Anvi’o contigs database
An Anvi’o contigs database will keep all the information related to your contigs: positions of open reading frames, k-mer frequencies for each contigs, where splits start and end, functional and taxonomic annotation of genes, etc. The contigs database is an essential component of everything related to Anvi’o metagenomic workflow.
Create the database
The following is the simplest way of creating a contigs database:
anvi-gen-contigs-database -f contigs.fa -o contigs.db
When you run this command, anvi-gen-contigs-database will,
-
Compute k-mer frequencies for each contig (the default is
4, but you can change it using--kmer-sizeparameter if you feel adventurous). -
Soft-split contigs longer than 20,000 bp into smaller ones (you can change the split size using the
--split-length). When gene calling step is not skipped, the process splitting contigs will consider where genes are and avoid cutting genes in the middle. For very very large assemblies this process can take a while, and you can skip it with--skip-mindful-splittingflag. -
Identify open reading frames using Prodigal, the bacterial and archaeal gene finding program developed at Oak Ridge National Laboratory and the University of Tennessee. If you don’t want gene calling to be done, you can use the flag
--skip-gene-callingto skip it. Genes are indexed to start at 0 rather than 1, a convention in Python.
Almost every Anvi’o program comes with a help menu that explains available parameters in detail. Don’t forget to check them once in a while. If something is not clearly explained, please let us know so we can fix that:
anvi-gen-contigs-database --help
Once you have your contigs database, you can start importing things into it, or directly go to the profiling step.
Add HMM data
Although this is absolutely optional, you shouldn’t skip this step. Anvi’o can do a lot with hidden Markov models (HMMs provide statistical means to model complex data in probabilistic terms that can be used to search for patterns, which works beautifully in bioinformatics where we create models from known sequences, and then search for those patterns rapidly in a pool of unknown sequences to recover hits). To decorate your contigs database with hits from HMM models that ship with the platform (which, at this point, constitute multiple published bacterial single-copy gene collections), run this command:
anvi-run-hmms -c contigs.db
When you run this command (without any other parameters),
-
It will utilize multiple default bacterial single-copy core gene collections and identify hits among your genes to those collections using HMMER. If you have already run this once, and now would like to add an HMM profile of your own, that is easy. You can use
--hmm-profile-dirparameter to declare where should Anvi’o look for it. -
Note that the program will use only one CPU by default, especially if you have multiple of them available to you, you should use the
--num-threadsparameter. It significantly improves the runtime, since HMMER is truly an awesome software.
Add taxonomy data
Annotating genes with taxonomy makes things downstream much more meaningful, and improves the human guided binning and refinement steps later on.
Anvio can import taxonomy data from any program using the tabular data format listed here.
For this tutorial we will be using Anvio’s preferred software, Centrifuge
First export all the gene calls from your database:
anvi-get-dna-sequences-for-gene-calls -c contigs.db -o gene-calls.fa
Then run Centrifuge with the following command:
/project/microbiome_workshop/metagenome/anvio/bin/centrifuge/centrifuge -f \
   -x /project/microbiome_workshop/metagenome/anvio/bin/centrifuge_data/p_compressed+h+v \
   gene-calls.fa -S centrifuge_hits.tsv
Finally import the taxonomic assignments back into Anvi’o
anvi-import-taxonomy -c contigs.db -i centrifuge_report.tsv centrifuge_hits.tsv -p centrifuge
You can use any file name you like, however, the order of input files is important: following the parameter -i, you should first declare the report file, and then the hits file.
Anvi’o import functions
Anvi’o can make good use of functional annotations of genes. Please see the following post to see how to import functions into Anvi’o:
Profiling BAM files
If you are here, you must be done with your contigs database, and have your BAM files ready. Good! It is time to initialize your BAM file, and create an Anvi’o profile for your sample.
Sorting the bam files
Anvi’o requires BAM files to be sorted and indexed. In most cases the BAM file you get back from your mapping software will not be sorted and indexed. This is why we named the BAM file for our mock samples as SAMPLE-01-RAW.bam, instead of SAMPLE-01.bam.
If your BAM files are already sorted and indexed (i.e., for each .bam file you have there also is a .bam.bai file in the same directory), you can skip this step. Otherwise, you need to initialize your BAM files:
anvi-init-bam SAMPLE-01-RAW.bam -o SAMPLE-01.bam
But of course it is not fun to do every BAM file you have one by one. So what to do?
A better way is to use a for loop.
Then, you can run anvi-init-bam on all of them by typing this:
for sample in ./*RAW.bam
  do
    bname=`basename "$sample" -RAW.bam`
    anvi-init-bam "$sample" -o "$bname".bam
  done
One last note, anvi-init-bam uses samtools in the background to do sorting and indexing. While clearly a big thanks and all the credit go to samtools developers, this is also a reminder that you can get your BAM files sorted and indexed using the samtools command line client without using anvi-init-bam.
anvi-profile
In contrast to the contigs database, an Anvi’o profile database stores sample-specific information about contigs. Profiling a BAM file with Anvi’o using anvi-profile creates a single profile that reports properties for each contig in a single sample based on mapping results. Each profile database links to a contigs database, and anvi’o can merge single profiles that link to the same contigs database into merged profiles (which will be covered later).
In other words, the profiling step makes sense of each BAM file separately by utilizing the information stored in the contigs database. It is one of the most critical (and also most complex and computationally demanding) steps of the metagenomic workflow.
The simplest form of the command that starts the profiling looks like this:
anvi-profile -i SAMPLE-01.bam -c contigs.db
But wait, don’t run this just yet. Run this instead and read about it while your samples are processing:
anvi-profile -i SAMPLE-01.bam -c contigs.db --output-dir SAMPLE-01 --sample-name SAMPLE-01
anvi-profile -i SAMPLE-02.bam -c contigs.db --output-dir SAMPLE-02 --sample-name SAMPLE-02
anvi-profile -i SAMPLE-03.bam -c contigs.db --output-dir SAMPLE-03 --sample-name SAMPLE-03
When you run anvi-profile it will,
-
Process each contig that is longer than
2,500 ntsby default. You can change this value by using--min-contig-lengthflag. But you should remember that the minimum contig length should be long enough for tetra-nucleotide frequencies to have enough meaningful signal. There is no way to define a golden number for minimum length that would be applicable to genomes found in all environments. We empirically chose the default to be 2,500, and have been happy with it. You are welcome to experiment, but we advise you to never go below 1,000. You also should remember that the lower you go, the more time it will take to analyze all contigs. You can use –list-contigs parameter to have an idea how many contigs would be discarded for a given--min-contig-lengthparameter. If you have an arbitrary list of contigs you want to profile, you can use the flag--contigs-of-interestto ignore the rest. -
Make up a default output directory, and sample name for you. We encourage you to use
--output-dirparameter to tell Anvi’o where to store your output files, and--sample-nameparameter to give a meaningful, preferably not-so-long sample name to be stored in the profile database. This name will appear almost everywhere, and changing it later will be a pain.
Processing of contigs will include,
-
The recovery of mean coverage, standard deviation of coverage, and the average coverage for the inner quartiles (Q1 and Q3) for a given contig. Profiling will also create an HD5 file where the coverage value for each nucleotide position will be kept for each contig for later use. While the profiling recovers all the coverage information, it can discard some contigs with very low coverage declared by
--min-mean-coverageparameter (the default is 0, so everything is kept). -
The characterization of single-nucleotide variants (SNVs) for every nucleotide position, unless you use
--skip-SNV-profilingflag to skip it altogether (you will definitely gain a lot of time if you do that, but then, you know, maybe you shouldn’t). By default, the profiler will not pay attention to any nucleotide position with less than 10X coverage. You can change this behavior via--min-coverage-for-variabilityflag. Anvi’o uses a conservative heuristic to not report every position with variation: i.e., if you have 200X coverage in a position, and only one of the bases disagree with the reference or consensus nucleotide, it is very likely that this is due to a mapping or sequencing error, and Anvi’o tries to avoid those positions. If you want Anvi’o to report everything, you can use--report-variability-fullflag. We encourage you to experiment with it, maybe with a small set of contigs, but in general you should refrain reporting everything (it will make your databases grow larger and larger, and everything will take longer for -99% of the time- no good reason). -
Finally, because single profiles are rarely used for genome binning or visualization, and since clustering step increases the profiling runtime for no good reason, the default behavior of profiling is to not cluster contigs automatically. However, if you are planning to work with single profiles, and if you would like to visualize them using the interactive interface without any merging, you can use
--cluster-contigsflag to initiate clustering of contigs. In this case Anvi’o would use default clustering configurations for single profiles, and store resulting trees in the profile database. You do not need to use this flag if you are planning to merge multiple profiles (i.e., if you have more than one BAM files to work with, which will be the case for most people).
Every Anvi’o profile that will be merged later, must be generated with the same exact parameters and against the same contigs database. Otherwise Anvi’o will complain about it later, and likely nothing will get merged.
Working with Anvi’o profiles
You have all your BAM files profiled! Did it take forever? Well, sorry about that. But now you are golden.
anvi-merge
The next step in the workflow is to to merge all Anvi’o profiles.
This is the simplest form of the anvi-merge command:
anvi-merge SAMPLE-01/PROFILE.db SAMPLE-02/PROFILE.db SAMPLE-03/PROFILE.db -o SAMPLES-MERGED -c contigs.db
Or alternatively you can run it like this (if your work directory contains multiple samples to be merged):
anvi-merge */PROFILE.db -o SAMPLES-MERGED -c contigs.db
When you run anvi-merge,
-
It will merge everything and create a merged profile (yes, thanks, captain obvious),
-
It will attempt to create multiple clusterings of your splits using the default clustering configurations. Please take a quick look at the default clustering configurations for merged profiles –they are pretty easy to understand. By default, Anvi’o will use euclidean distance and ward linkage algorithm to organize contigs, however, you can change those default values with
--distanceand--linkageparameters (available options for distance metrics and linkage algorithms are listed in this release note). Hierarchical clustering results are necessary for comprehensive visualization, and human guided binning, therefore, by default, Anvi’o attempts to cluster your contigs using default configurations. You can skip this step by using--skip-hierarchical-clusteringflag. But even if you don’t skip it, Anvi’o will skip it for you if you have more than 20,000 splits, since the computational complexity of this process will get less and less feasible with increasing number of splits. That’s OK, though. There are many ways to recover from this. On the other hand, if you want to teach everyone who is the boss, you can force Anvi’o try to cluster your splits regardless of how many of them are there by using--enforce-hierarchical-clusteringflag. You have the power. -
It will attempt to run CONCOCT to bin your splits automatically. CONCOCT can deal with hundreds of thousands of splits. Which means, regardless of the number of splits you have, and even if you skip the hierarchical clustering step, there will be a collection in the merged profile database (which will be called
CONCOCT) with genome bins identified by CONCOCT in an automatic manner. From which you can generate a summary, or run the interactive interface with--collection-name CONCOCTparameter (more later on these). But if you would like to skip default CONCOCT clustering, you can use--skip-concoct-binningflag.
anvi-import-collection
If you have your own binning of your contigs, you can easily import those results into the merged profile database as a collection:
Concoct can be slow for large datasets. Metabat and Maxbin are good alternatives for metagenome binning.
anvi-import-collection binning_results.txt -p SAMPLES-MERGED/PROFILE.db -c contigs.db --source "SOURCE_NAME"
The file format for binning_results.txt is very simple. This is supposed to be a TAB-delimited file that contains information about which contig belongs to what bin. So each line of this TAB-delimited file should contain a contig name (or split name, see below), and the bin name they belong to. If you would like to see some example files, you can find them here. They will help you see the difference between input files for splits and contigs after reading the following bullet points, and demonstrate the structure of the optional “bins information” file.
Two points:
-
It is common that we use
anvi-export-splits-and-coveragesto export coverage and sequence composition information to bin our contigs with software that can work with coverage and sequence composition information. In this case, ourbinning_results.txtcontains split names. But if you have contig names, you can import them usinganvi-import-collectionwith the flag--contigs-mode. -
You can also use an information file with the
--bins-infoparameter to describe the source of your bins (and even assign them some colors to have some specific visual identifiers for any type of visualization downstream).
You can use anvi-export-collection to export collection information and import into other profiles. It becomes very handy when you are doing benchmarking between different approaches.
anvi-interactive
Anvi’o interactive interface is one of the most sophisticated parts of Anvi’o. In the context of the metagenomic workflow, the interactive interface allows you to browse your data in an intuitive way as it shows multiple aspects of your data, visualize the results of unsupervised binning, perform supervised binning, or refine existing bins.
The interactive interface of Anvi’o is written from scratch, and can do much more than what is mentioned above. In fact, you don’t even need Anvi’o profiles to visualize your data using the interactive interface. But since this is a tutorial for the metagenomic workflow, we will save you from these details. If you are intersted to learn more, we have other resources that provide detailed descriptions of the Anvi’o interactive interface and data formats it works with.
Most things you did so far (creating a contigs database, profiling your BAM files, merging them, etc) required you to work on a server. But anvi-interactive will require you to dig an SSH tunnel to use your server to run anvi-interactive, and the browser on your computer to interact with it. See the post on visualizing from a server.
To run Anvi’o on a compute node we have to to take some special steps, launching anvi-interactive in the background with the & sign.
anvi-interactive -p SAMPLES-MERGED/PROFILE.db -c contigs.db &
Now wait until you see the string:
The server is now listening the port number "8080". When you are finished, press CTRL+C to terminate the server.
Now that the server is running, make a note of the hostname
hostname -s
On your local machine, launch Chrome browser and go to http://cereslogin.its.iastate.edu/hostname (Replace hostname with the hostname of your compute node: sn-cn-x-x). Note: Firefox and Internet Explorer are not supported, Safari seems to work but Chrome is preferred. This link is a workaround for the workshop and may be replaced at some point in the future.
If you get “502 Bad Gateway” ; you either
- did not wait for the string appear to know that the webserver was running,
- you mistyped the URL, or
- you have the wrong hostname
After you have completed your tasks, make sure to terminate the instance of web server that you launched on the compute nodes.
killall anvi-interactive
This will work perfectly if your merged profile has its own trees (i.e., the hierarchical clustering mentioned in the anvi-merge section was done).
If there are no clusterings available in your profile database anvi-interactive will complain about the fact that it can’t visualize our profile. But if you have an Anvi’o collection stored in your profile database you can run the interactive interface in collection mode. If you are not sure whether you have a collection or not, you can see all available collections using this command:
$ anvi-script-get-collection-info -p SAMPLES-MERGED/PROFILE.db -c contigs.db --list-collections
Once you know the collection you want to work with, you can use this notation to visualize it:
$ anvi-interactive -p SAMPLES-MERGED/PROFILE.db -c contigs.db -C CONCOCT
When you run anvi-interactive with a collection name, it will compute various characteristics of each bin on-the-fly, i.e., their mean coverage, variability, completion and redundancy estimates, and generate Anvi’o views for them to display their distribution across your samples in the interactive interface. Briefly, each leaf of the Anvi’o central dendrogram will represent a “bin” in your collection, instead of a “contig” in your metagenomic assembly. A dendrogram for bins will be generated for each view using euclidean distance and ward linkage automatically. When running the interactive interface in collection mode, you can change those defaults using the --distance and/or --linkage parameters. If you have run anvi-merge with --skip-hierarchical-clustering parameter due to the large number of contigs you had, but if you have binning results available to you from an external resource, you can import those bins as described in the previous section, and run the interactive interface with that collection id to immediately see the distribution of bins across your samples.
In this mode each leaf of the tree will be a bin, along with the distribution of each bin across samples with their completion and redundancy estimates in the most outer layers. In this mode, the interface runs in reduced functionality, and selections will not have completion and contamination estimates. If you are interested in visualizing a specific bin with, say, high redundancy, then you can use the program anvi-refine with that bin.
Here is some additional information about the interactive interface (please see a full list of other options by typing anvi-interactive -h):
-
Storing visual settings. The interactive interface allows you to tweak your presentation of data remarkably, and store these settings in profile databases as “states”. If there is a state stored with the name
default, or if you specify a state when you are running the program via--stateparameter, the interactive interface will load it, and proceeds to visualize the data automatically (without waiting for you to click the Draw button). States are simply JSON formatted data, and you can export them from or import them into an Anvi’o profile database usinganvi-export-stateandanvi-import-stateprograms. This way you can programmatically edit state files if necessary, and/or use the same state file for multiple projects. -
Using additional data files. When you need to display more than what is stored in Anvi’o databases for a project, you can pass additional data files to the interactive interface. If you have a newick tree as an alternative organization of your contigs, you can pass it using the
--treeparameter, and it would be added to the relevant combo box. If you have extra layers to show around the tree (see Figure 1 in this publication as an example), you can use the--additional-layersparameter. Similarly, you can pass an extra view using the--additional-viewparameter. Files for both additional layers and additional view is expected to be TAB-delimited text files and information to be provided at the split-level (if you hate this the way we do please let us know, and we will be like “alright alright” and finally fix it). Please see the help menu for more information about the expected format for these files. -
Setting a taxonomic level. When information about taxonomy is available in an Anvi’o contigs database, Anvi’o interactive interface will start utilizing it automatically and you will see a taxonomy layer in the interface for each of your contigs. By default the genus names will be used, however, you can change that behavior using the
--taxonomic-levelflag.
anvi-gen-samples-info-database
This is an optional database purely to improve visualization. Please see this article for more information:
anvi-summarize
A collection represents one or more bins with one or more contigs. Collections are stored in Anvi’o databases can be imported from the results of external binning software, or saved through the anvi-interactive interface after a human-guided binning effort. Once you have a collection, you can summarize it using anvi-summarize.
The result of anvi-summarize is a static HTML output you can browse in your browser, send to your colleagues, put it on your web page (an example from one of our papers is here), or attach it to your submission as a supplementary data for review. When you run anvi-summarize,
-
All your splits will be merged back to contigs and stored as FASTA files,
-
Completion and redundancy estimates for each bin in a collection will be computed and stored in the output,
-
TAB-delimited matrix files will be generated for genome bins across your samples with respect to their mean coverage, variability, etc.
You can run this to summarize the bins saved under the collection id ‘CONCOCT’ into MY_SUMMARY directory:
anvi-summarize -p SAMPLES-MERGED/PROFILE.db -c contigs.db -o SAMPLES-SUMMARY -C CONCOCT
If you are not sure which collections are available to you, you can always see a list of them by running this command:
anvi-summarize -p SAMPLES-MERGED/PROFILE.db -c contigs.db --list-collections
The summary process can take a lot of time. If you want to take a quick look to identify which bins need to be refined, you can run anvi-summarize with --quick-summary flag.
anvi-refine
After running anvi-summarize, you may realize that you are not happy with one or more of your bins. This often is the case when you are working with very large datasets and when you are forced to skip the human guided binning step. anvi-summarize gives you the ability to make finer adjustments to a bin that may be contaminated.
After you refine bins that needs attention, you can re-generate your static summary.
Speaking of which, please take a look at this post where Meren talks about assessing completion and contamination of metagenome-assembled genomes.
Please read this article for a comprehensive introduction to refinement capacity of Anvi’o.